> ## Documentation Index
> Fetch the complete documentation index at: https://docs.agicto.com/llms.txt
> Use this file to discover all available pages before exploring further.
# Codex 接入
> 在 Codex 客户端和 Codex CLI 中使用 AGICTO API
你可以把 AGICTO API 配置为 Codex 的自定义模型供应商。Codex 客户端和 Codex CLI 都读取本机的 Codex 配置。
## 准备
* 已安装 Codex 客户端或 Codex CLI
* 已获取 AGICTO API 的 API Key
* 已确认你的账户有可用余额或额度
* 已从 模型列表 复制可用模型名
## 配置值
| 字段 | 值 |
| ------------- | --------------------------- |
| Provider name | `agicto` |
| Base URL | `https://api.agicto.cn/v1/` |
| API Key | 你的 AGICTO API Key |
| Wire API | `responses` |
| Model | 你的账户可用模型名 |
Codex 使用 OpenAI 兼容格式时,Base URL 需要包含 `/v1`。
## Codex 客户端
Codex 桌面客户端通过本机配置文件读取自定义供应商。你可以在客户端里打开配置文件,然后写入 AGICTO API 配置。
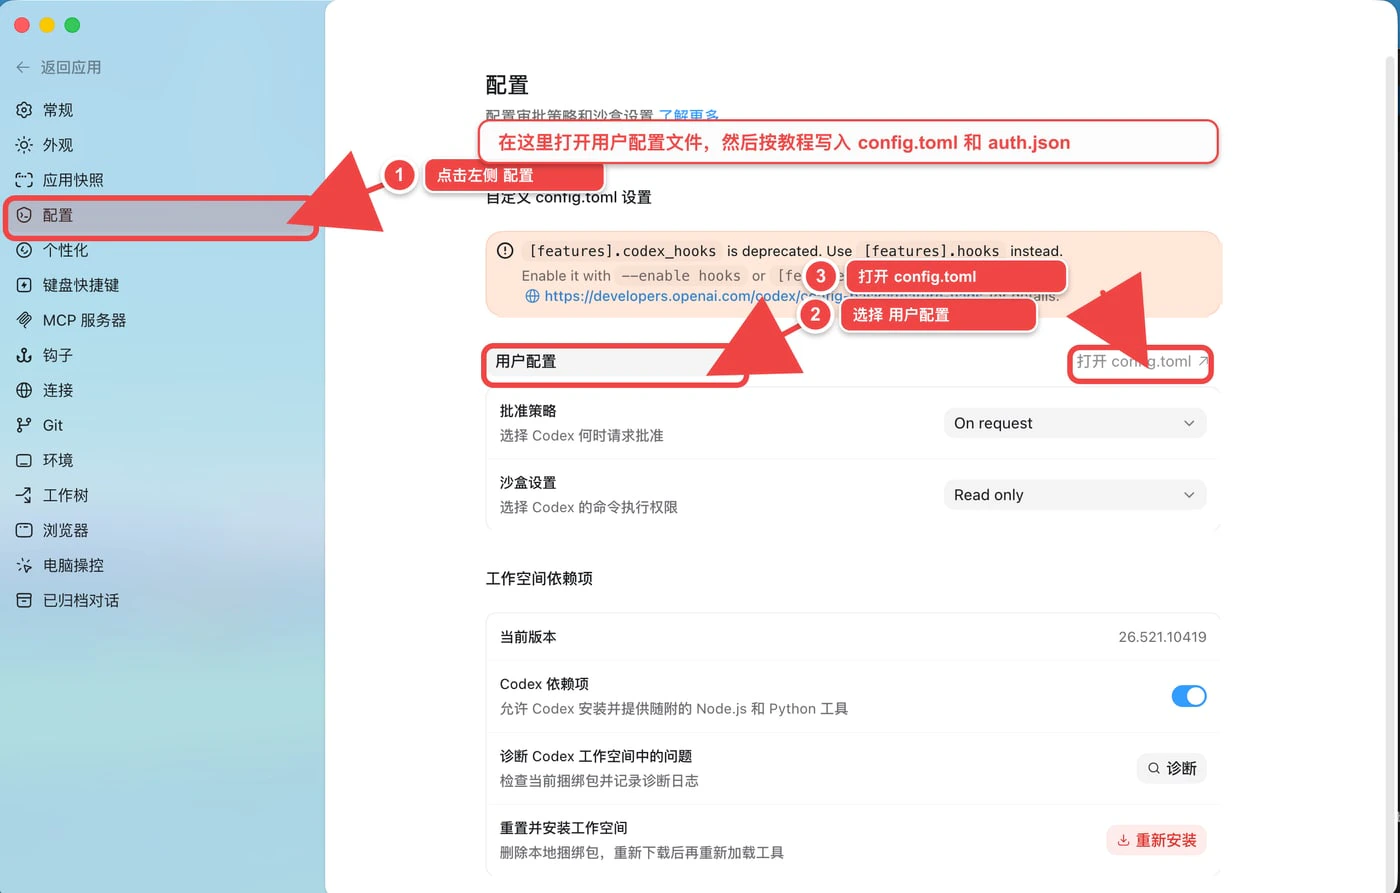 在 Codex 客户端左侧点击 **配置**。
在 **自定义 config.toml 设置** 区域选择 **用户配置**。
点击 **打开 config.toml**,编辑 `~/.codex/config.toml`。
将 AGICTO API 供应商配置写入 `config.toml`。
客户端按钮不会直接打开 `auth.json`。请在同一个 `~/.codex` 目录中打开或新建 `auth.json`,并写入 AGICTO API Key。
退出并重新打开 Codex 客户端,让客户端重新加载配置。
### config.toml 配置
文件位置:`~/.codex/config.toml`
```toml theme={null}
model_provider = "agicto"
model = "gpt-5.5"
model_reasoning_effort = "medium"
[model_providers.agicto]
name = "AGICTO API"
base_url = "https://api.agicto.cn/v1/"
wire_api = "responses"
requires_openai_auth = true
```
将 `model` 替换为你的账户可用模型名。
如果你的 `config.toml` 已经有其他配置,只需要保留原有内容,并补充或修改上面的 `model_provider`、`model` 和 `[model_providers.agicto]`。
### auth.json 配置
文件位置:`~/.codex/auth.json`
点击 **打开 config.toml** 后,编辑器会打开 `~/.codex/config.toml`。`auth.json` 就在同一个 `~/.codex` 目录中。
如果你使用 macOS,可以在终端中打开这个目录:
```bash theme={null}
open ~/.codex
```
然后找到或新建 `auth.json`。
你也可以直接用编辑器打开:
```bash theme={null}
code ~/.codex/auth.json
```
如果你没有安装 VS Code 命令行,也可以用系统自带编辑器打开:
```bash theme={null}
open -e ~/.codex/auth.json
```
写入以下内容:
```json theme={null}
{
"OPENAI_API_KEY": "你的_AGICTO_API_KEY"
}
```
Codex 会用 `OPENAI_API_KEY` 字段作为 OpenAI 兼容供应商的认证 Key。
`auth.json` 会保存真实 API Key。不要把这个文件提交到 Git 仓库,也不要把它发给其他人。
## Codex CLI
Codex CLI 读取同样的 `~/.codex/config.toml` 和 `~/.codex/auth.json`。
### 设置 API Key
在终端中设置环境变量:
```bash theme={null}
export AGICTO_API_KEY="你的_AGICTO_API_KEY"
export OPENAI_API_KEY="$AGICTO_API_KEY"
```
你也可以用 Codex CLI 把 API Key 写入 `~/.codex/auth.json`:
```bash theme={null}
printenv AGICTO_API_KEY | codex login --with-api-key
```
如果你手动编辑了 `auth.json`,可以跳过这条登录命令。
如果你希望每次打开终端自动生效,可以把上面的内容加入 `~/.zshrc`、`~/.bashrc` 或你的 shell 配置文件。
不要把真实 API Key 提交到 Git 仓库。只在本机环境变量或本机私有配置中保存它。
### 写入 config.toml
编辑 `~/.codex/config.toml`,加入以下配置:
```toml theme={null}
model_provider = "agicto"
model = "gpt-5.5"
model_reasoning_effort = "medium"
[model_providers.agicto]
name = "AGICTO API"
base_url = "https://api.agicto.cn/v1/"
wire_api = "responses"
requires_openai_auth = true
```
将 `model` 替换为你的账户可用模型名。
### 启动 CLI
在项目目录中运行:
```bash theme={null}
codex
```
你也可以临时指定模型:
```bash theme={null}
codex -m gpt-5.5
```
或直接发起一次非交互式请求:
```bash theme={null}
codex exec "用一句话介绍当前项目"
```
## 一次性命令
如果你不想立即修改配置文件,可以用 `-c` 临时覆盖配置:
```bash theme={null}
OPENAI_API_KEY="$AGICTO_API_KEY" codex \
-c model_provider='"agicto"' \
-c model='"gpt-5.5"' \
-c model_providers.agicto.name='"AGICTO API"' \
-c model_providers.agicto.base_url='"https://api.agicto.cn/v1/"' \
-c model_providers.agicto.wire_api='"responses"' \
-c model_providers.agicto.requires_openai_auth=true
```
## 验证
先确认 Codex CLI 可以读取配置:
```bash theme={null}
codex doctor
```
然后发起一次简单请求:
```bash theme={null}
codex exec "只回复 ok"
```
如果返回 `ok`,说明 Codex 已通过 AGICTO API 完成调用。
## 常见问题
### 报 `No Codex credentials were found`
Codex 没有读到 API Key。请确认当前终端中已经设置:
```bash theme={null}
echo "$OPENAI_API_KEY"
```
如果没有输出,请重新执行:
```bash theme={null}
export OPENAI_API_KEY="$AGICTO_API_KEY"
```
### 报 `model not found`
模型名称不可用或拼写错误。请从 模型列表 复制完整模型名,并更新 `model`。
### 报 `wire_api = "chat" is no longer supported`
当前 Codex CLI 需要使用 Responses API。请确认供应商配置中包含:
```toml theme={null}
wire_api = "responses"
```
### 连接失败或超时
请先用 `curl` 验证 AGICTO API Key 和网络:
```bash theme={null}
curl https://api.agicto.cn/v1/models \
-H "Authorization: Bearer $AGICTO_API_KEY"
```
如果 `curl` 可以返回模型列表,但 Codex 失败,请检查 Base URL 是否为 `https://api.agicto.cn/v1/`,并确认终端中 `OPENAI_API_KEY` 已设置。
在 Codex 客户端左侧点击 **配置**。
在 **自定义 config.toml 设置** 区域选择 **用户配置**。
点击 **打开 config.toml**,编辑 `~/.codex/config.toml`。
将 AGICTO API 供应商配置写入 `config.toml`。
客户端按钮不会直接打开 `auth.json`。请在同一个 `~/.codex` 目录中打开或新建 `auth.json`,并写入 AGICTO API Key。
退出并重新打开 Codex 客户端,让客户端重新加载配置。
### config.toml 配置
文件位置:`~/.codex/config.toml`
```toml theme={null}
model_provider = "agicto"
model = "gpt-5.5"
model_reasoning_effort = "medium"
[model_providers.agicto]
name = "AGICTO API"
base_url = "https://api.agicto.cn/v1/"
wire_api = "responses"
requires_openai_auth = true
```
将 `model` 替换为你的账户可用模型名。
如果你的 `config.toml` 已经有其他配置,只需要保留原有内容,并补充或修改上面的 `model_provider`、`model` 和 `[model_providers.agicto]`。
### auth.json 配置
文件位置:`~/.codex/auth.json`
点击 **打开 config.toml** 后,编辑器会打开 `~/.codex/config.toml`。`auth.json` 就在同一个 `~/.codex` 目录中。
如果你使用 macOS,可以在终端中打开这个目录:
```bash theme={null}
open ~/.codex
```
然后找到或新建 `auth.json`。
你也可以直接用编辑器打开:
```bash theme={null}
code ~/.codex/auth.json
```
如果你没有安装 VS Code 命令行,也可以用系统自带编辑器打开:
```bash theme={null}
open -e ~/.codex/auth.json
```
写入以下内容:
```json theme={null}
{
"OPENAI_API_KEY": "你的_AGICTO_API_KEY"
}
```
Codex 会用 `OPENAI_API_KEY` 字段作为 OpenAI 兼容供应商的认证 Key。
`auth.json` 会保存真实 API Key。不要把这个文件提交到 Git 仓库,也不要把它发给其他人。
## Codex CLI
Codex CLI 读取同样的 `~/.codex/config.toml` 和 `~/.codex/auth.json`。
### 设置 API Key
在终端中设置环境变量:
```bash theme={null}
export AGICTO_API_KEY="你的_AGICTO_API_KEY"
export OPENAI_API_KEY="$AGICTO_API_KEY"
```
你也可以用 Codex CLI 把 API Key 写入 `~/.codex/auth.json`:
```bash theme={null}
printenv AGICTO_API_KEY | codex login --with-api-key
```
如果你手动编辑了 `auth.json`,可以跳过这条登录命令。
如果你希望每次打开终端自动生效,可以把上面的内容加入 `~/.zshrc`、`~/.bashrc` 或你的 shell 配置文件。
不要把真实 API Key 提交到 Git 仓库。只在本机环境变量或本机私有配置中保存它。
### 写入 config.toml
编辑 `~/.codex/config.toml`,加入以下配置:
```toml theme={null}
model_provider = "agicto"
model = "gpt-5.5"
model_reasoning_effort = "medium"
[model_providers.agicto]
name = "AGICTO API"
base_url = "https://api.agicto.cn/v1/"
wire_api = "responses"
requires_openai_auth = true
```
将 `model` 替换为你的账户可用模型名。
### 启动 CLI
在项目目录中运行:
```bash theme={null}
codex
```
你也可以临时指定模型:
```bash theme={null}
codex -m gpt-5.5
```
或直接发起一次非交互式请求:
```bash theme={null}
codex exec "用一句话介绍当前项目"
```
## 一次性命令
如果你不想立即修改配置文件,可以用 `-c` 临时覆盖配置:
```bash theme={null}
OPENAI_API_KEY="$AGICTO_API_KEY" codex \
-c model_provider='"agicto"' \
-c model='"gpt-5.5"' \
-c model_providers.agicto.name='"AGICTO API"' \
-c model_providers.agicto.base_url='"https://api.agicto.cn/v1/"' \
-c model_providers.agicto.wire_api='"responses"' \
-c model_providers.agicto.requires_openai_auth=true
```
## 验证
先确认 Codex CLI 可以读取配置:
```bash theme={null}
codex doctor
```
然后发起一次简单请求:
```bash theme={null}
codex exec "只回复 ok"
```
如果返回 `ok`,说明 Codex 已通过 AGICTO API 完成调用。
## 常见问题
### 报 `No Codex credentials were found`
Codex 没有读到 API Key。请确认当前终端中已经设置:
```bash theme={null}
echo "$OPENAI_API_KEY"
```
如果没有输出,请重新执行:
```bash theme={null}
export OPENAI_API_KEY="$AGICTO_API_KEY"
```
### 报 `model not found`
模型名称不可用或拼写错误。请从 模型列表 复制完整模型名,并更新 `model`。
### 报 `wire_api = "chat" is no longer supported`
当前 Codex CLI 需要使用 Responses API。请确认供应商配置中包含:
```toml theme={null}
wire_api = "responses"
```
### 连接失败或超时
请先用 `curl` 验证 AGICTO API Key 和网络:
```bash theme={null}
curl https://api.agicto.cn/v1/models \
-H "Authorization: Bearer $AGICTO_API_KEY"
```
如果 `curl` 可以返回模型列表,但 Codex 失败,请检查 Base URL 是否为 `https://api.agicto.cn/v1/`,并确认终端中 `OPENAI_API_KEY` 已设置。